

What Nails To Use With Azek Trim Board
Cut and Installing Plastic Trim
Larn the secrets of successful PVC trim installation.
![]() Time
Time
Multiple Days
![]() Complexity
Complexity
Intermediate
![]() Toll
Toll
Varies
Introduction
PVC trim looks and cuts like forest and it lasts forever, but there are a few special installation techniques you demand to know nearly to install it successfully.
Tools Required
Materials Required
- 100% acrylic exterior pigment
- Acrylic caulk
- Exterior filler
- Long-setting PVC cement
- PVC trim
- Stainless steel trim-caput screws
Tired of scraping and repainting your trim? Or disheartened when you discover that your trim has rotted and will no longer hold pigment? Then stride back and consider the advantages of replacing those trouble boards with PVC azek trim—your worries will be over.
Cellular PVC board (polyvinyl chloride) azek trim is a close cousin of the familiar white plastic plumbing pipes. (The "cellular" part only means information technology's filled with zillions of tiny air bubbles to brand the material lighter and less expensive to industry.) But unlike its cousin, PVC azek trim is specially formulated to brand information technology resistant to sunlight, hold pigment well and easy to piece of work with.
PVC azek trim looks just similar wood (well, flawless wood) and lasts virtually forever. PVC azek trim impervious to rot and insect set on and doesn't absorb water. It holds pigment well considering water tin can't penetrate the material behind the pigment. And if you like the await of white trim, you may not have to paint it at all (more on this later). It's an particularly adept substitute for wood trim in areas that are highly exposed to h2o, such as corner trim boards and door trim that'southward virtually the ground or unprotected past an overhang.
Although you install cellular PVC azek trim near similar woods, at that place are a few crucial differences. In this story, nosotros'll show you those special cutting, joining and fastening techniques and then your PVC azek trim volition perform flawlessly for the life of your abode. Don't worry—there aren't any fancy tools or skills required. If you've cut and installed wood trim before, you have the moxie to work with PVC trim boards.
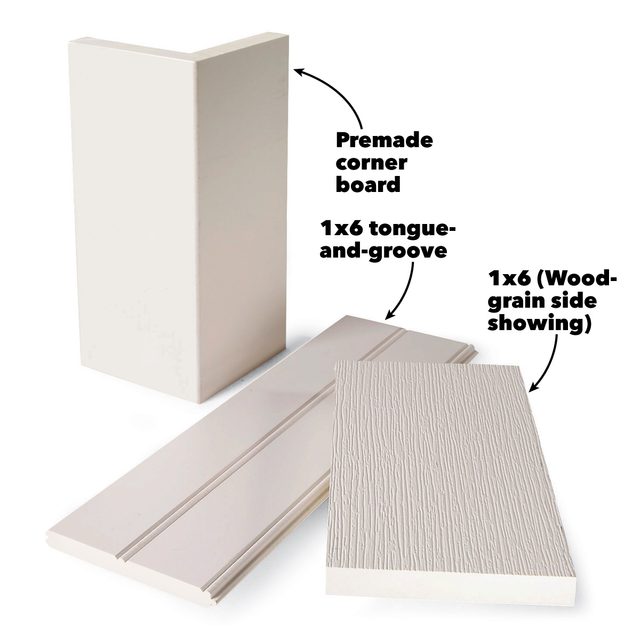
PVC trim is sold in v/iv (one-in.) and 4/4 (3/four-in.) thicknesses in the common widths found with wood. But the selection may be limited. You'll probably accept to special-order some thicknesses and widths. PVC trim boards are sometimes simply sold in eighteen-ft. lengths, so you may want to take your gild delivered. Most companies offering material that has an embossed wood grain side and a smooth side, so y'all tin choose the await you desire. Don't confuse cellular vinyl trim with polyurethane-cadre, vinyl-coated products. While they as well are highly durable low-maintenance products, their installation techniques are different.
PVC trim isn't cheap; await to pay almost the same price you'd pay for clear, knot-free woods. Other PVC products are likewise available, including preformed outside corners, tongue-and-groove boards, and canvass goods that you can cleave up and piece of work just like plywood.
Find PVC trim past contacting lumberyards in your surface area.
Project footstep-past-step (9)
Step 1
Cutting with carbide-tipped saw blades and bits

Cut PVC trim boards with the same hand and power tools that yous use for wood. But use only carbide-tipped saw blades; obviously steel ones will wearisome apace. In general, the more teeth a blade has, the smoother the cut edges will exist. We recommend standard combination saw blades. You can easily rout decorative edges or grooves with routers or shapers, but utilize carbide-edged bits as well.
Sawn edges aren't as like shooting fish in a barrel to sand as forest. Then if possible, programme your work and so that newly cutting edges volition barrel against siding, soffits or other trim, and let the smoother factory edge prove wherever possible. Sanding isn't always necessary, peculiarly if you plan to paint. Only sand exposed edges that are highly visible, like near the front door. Utilize a random orbital sander with 100-grit newspaper. Chugalug sanding doesn't work well because the friction from the chugalug melts the plastic rather than smoothing it.
Stride ii
Fasten PVC trim with stainless steel screws or hot-dipped siding nails

When it comes to choosing your fasteners, don't scrimp by using fasteners that won't last as long as the vinyl trim. Stainless steel screws with modest finish heads are the best choice because they'll never corrode. You tin can also utilize hot-dipped galvanized nails, simply they may corrode and stain the trim over fourth dimension. If you want a flawless finish, choose screws, countersink them slightly, and then use an exterior filler to hide the screw heads. In areas that are completely protected from water, like nether a soffit, you lot can use a 15-approximate air nailer with galvanized nails and fill the holes with paintable caulk or filler.
PVC tends to expand and contract with temperature changes, then fasten it well. Bulldoze screws or nails into framing only, never just to the sheathing. Select fastener lengths that will penetrate at least 1-1/2 in. into the framing. No predrilling or countersinking is necessary if the temperature is over 40 degrees F when you install the trim. But lower temperatures call for both drilling and countersinking; otherwise the vinyl may split. Place fasteners every 16 in. at both sides of the trim, spacing them about 1/ii in. from the edges. If you're using 10-in. or wider trim, add another fastener in the middle.
Follow all of the flashing techniques that yous would with woods trim. You however want to prevent water from penetrating betwixt the PVC trim boards and the wall sheathing behind.
![]()
Step 3
Cement seams for sturdy, watertight joints

One advantage of PVC is that y'all can "weld" joints to keep them tight and foreclose h2o from penetrating behind the trim. Manufacturers recommend a special type of PVC cement that has a longer "open fourth dimension" than the blazon of cement that plumbers use on plastic pipes. You can buy this cement wherever y'all buy the trim. You'll accept about v minutes of working time to clamp and fasten the joints before the cement sets. Smear a fiddling cement on both surfaces then clamp or screw the joint together. Wipe off any excess correct away with a clammy rag; different PVC pipe cement, information technology'southward water soluble and won't mar finished surfaces if yous remove it immediately.
Step 4
Preassemble window and door trim
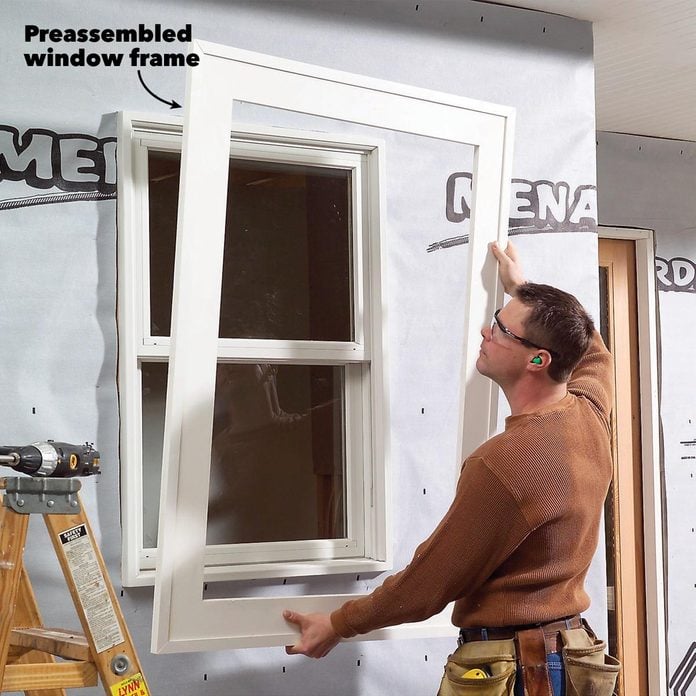
Prebuild PVC trim assemblies so install them every bit a unit rather than a piece at a fourth dimension as you lot would with woods. This will take a picayune longer only will consequence in perfectly tight joints that won't demand caulk. Cement and screw end joints similar miters and butt joints. Longer joints similar corner boards tin can be simply cemented and clamped.
Pocket screws are the best method of joining corners when you're cementing window and door trim assemblies (Photos i and two). Use the coarse-threaded version of pocket screws. Cut miters to fit and dry-fit your cuts to check the joints and lengths. Measure carefully when applying trim effectually vinyl or aluminum-clad windows to leave a i/8-in. expansion gap between the trim and frame for caulk.
Footstep v
Preassemble corner PVC boards

Some manufacturers offer pre-fabricated trim for outside corners, but it'due south somewhat pricey. Information technology's easy to make your own. Start by ripping 45-caste bevels on i edge of each lath on a tabular array saw. Then push the bevel tips together tightly and tape the boards together with packaging or duct record. Utilise cement to both bevels, then fold the boards together and clamp the joint for most 15 minutes with more strips of tape.
Footstep 6
Get out expansion gaps on long pieces

PVC trim boards will expand and contract with broad variations in temperature. If you're installing trim in temps higher than lxxx degrees F, cutting pieces to fit tightly. If information technology's between lx and 80 degrees, leave a i/16-in. gap for every 18 ft. of length. Below lx degrees, exit a one/8-in. gap. Afterward installation, cover the gap with acrylic or urethane caulk. Avert silicone-based caulks; they don't adhere well to vinyl.
Pace 7
Fill up fastener holes before you pigment

Make full pocket-sized holes with an exterior filler and lightly sand it smoothen afterwards it dries. Or apply a paintable caulk and smooth it with your finger. Fill larger holes or damaged areas with automobile torso filler, and again, sand it after information technology cures.
Step 8
Splice long trim pieces with scarf joints

Splice long pieces of PVC trim with "scarf joints," that is, overlapping 45-caste joints. Cut the beginning slice of trim to fall just brusque of a stud so the second overlapping trim slice tin can be attached to the stud an inch or so from the finish to preclude splitting.
Step 9
Paint vinyl trim with 100 percent acrylic exterior paint

Although painting PVC trim boards isn't necessary, we recommend it. Otherwise your trim volition expect stark white and you may run across filler over holes that'southward not an exact color friction match. And the edges and ends (especially ones that yous have cutting or routed) volition collect dirt and brainstorm to look gray over fourth dimension.
At that place's no hurry for painting after installation; you tin can wait as long every bit you desire. PVC boards won't weather or lose its power to hold pigment. Before you pigment, use mild detergent to make clean off grime and oils left over from handling and brand sure the surfaces are dry out. And so finish it with whatever exterior 100 percent acrylic paint. Use lighter shades rather than darker shades. Nighttime colors tend to absorb more than heat and increase expansion. Next, cheque out exterior painting tips you demand to know.
Originally Published: February 22, 2021
Source: https://www.familyhandyman.com/project/cutting-installing-plastic-trim/
Posted by: williamsappece1985.blogspot.com
0 Response to "What Nails To Use With Azek Trim Board"
Post a Comment